

How To Configure Dhcp Server In Windows 2008 Server Ppt
David Davis
Network Administrator - Dynamic Host Configuration Protocol (DHCP) is a core infrastructure service on networks that provides IP addressing and DNS server data for clients and other devices. DHCP is used so that you do not have to assign static IP addresses for each device on the network besides managing the dynamic IP address creation problems. Increasingly, DHCP is expanded to accommodate new network services such as indows Health Service and Network Admission Protection (NAP). However, earlier you can use its advanced services, you need to install and configure some basic issues. That is the content we will introduce in the article.
Install Windows Server 2008 DHCP Server
Installing Windows Server 2008 DCHP Server is piece of cake. DHCP Server is currently a 'role' of Windows Server 2008 - not a separate component equally earlier.
To install Windows Server 2008 DCHP Server, yous need an installed Windows Server 2008 organisation and configured with a static IP accost. You need to know the range of your network IP accost, the range of IP addresses yous want to utilize for clients, DNS server IP addresses and default ports. In addition, you as well plan for all the relevant subnets, the scope you will define and what barriers to create.
To start the DHCP installation process, you tin click Add Roles from the Initial Configuration Tasks window or from Server Director> Roles> Add together Roles.

Figure i: Adding a new Function in Windows Server 2008
When the Add together Roles Magician appears, click Next on that screen.
Next, select the desired component, DHCP Server Office , and and then click Next.

Figure two: Select DHCP Server Function
If no static IP accost is assigned on the server, you will get a alarm, this alert informs you that yous should not install DHCP with a dynamic IP accost.
Here, you will be prompted for network IP data, range data and DNS information. If you lot simply install the DHCP server without configuring the scope and settings, only click Side by side through the questions during the installation process.
On the other mitt, yous tin can also configure the DHCP Server choice during this phase of the installation.
In our case, I chose to configure some basic IP settings and configure the showtime DHCP Telescopic.
We have shown our compelling network connectedness and have been asked to verify it, similar below:

Figure 3: Necktie the network connection
What this wizard asks is, 'what interface practise y'all want to provide DHCP services on?' temporarily translated every bit 'what interface do yous want to provide for DHCP services?' Nosotros have selected the default and clicked Adjacent.
Next, enter the Parent Domain , Primary DNS Server, and Alternate DNS Server (come across image below) and click Side by side.

Figure 4: Entering domain and DNS data
We chose Non to use WINS on our network and click Side by side .
We will then be upgraded to configure the DHCP scope for the new DHCP Server. Choose to configure the IP address range of 192.168.1.50-100 for more than 25 clients on our local network. To do that, you demand to click Add together to add a new scope. As you can run into in the figure below, nosotros have named Scope WBC-Local, configured the start and end IP address 192.168.1.50-192.168.1.100, the subnet mask is 255.255.255.0, default The gateway is 192.168.i.i, subnet type , and activated the telescopic.
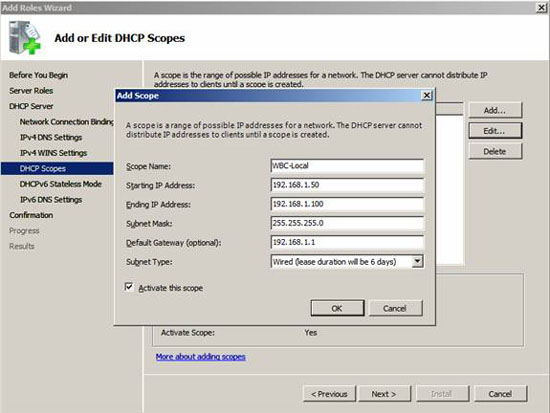
Figure 5: Add a new DHCP Scope
Dorsum in the Add Scope screen, we click Next to add a new scope (when the DHCP Server is installed).
Select Disable DHCPv6 stateless style for this server and click Next.
Then ostend DHCP Installation Selections (on the screen below) and click Install .
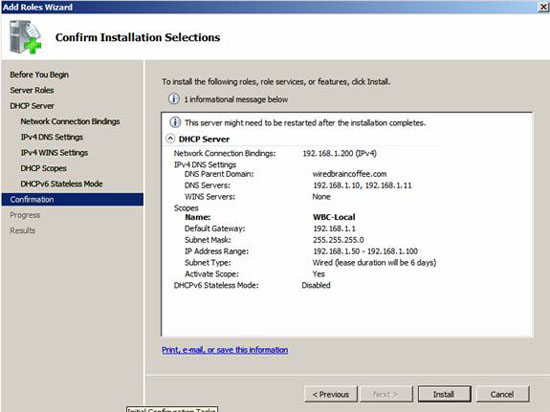
Figure 6: Confirm the install options
After a few seconds, the DHCP Server will be installed and nosotros volition come across a window announced as shown beneath:
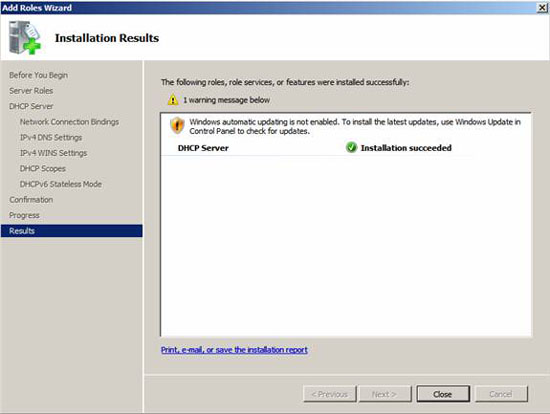
Figure seven: Successful installation of Windows Server 2008 DHCP Server
Click Close to close the installation window, and so switch to how to manage the DHCP Server.
Manage the new Windows Server 2008 DHCP Server
As with installation, managing Windows Server 2008 DHCP Server is besides very simple. Going back to the Windows Server 2008 Server Manager , in Roles , click on the DHCP Server entry .
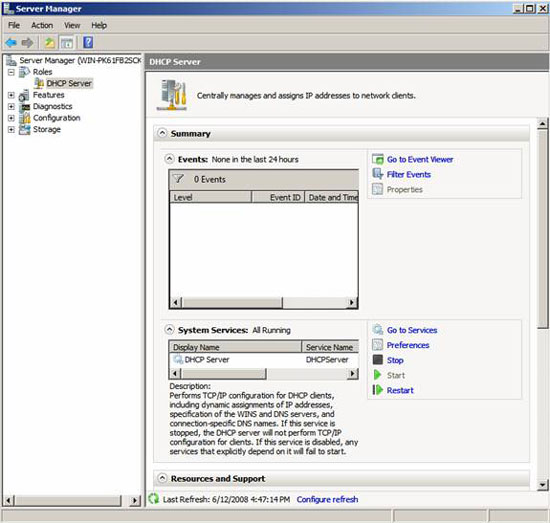
Figure 8: DHCP Server Manager in Server Manager
Considering DHCP Server and client scopes cannot be managed here, what nosotros can do is manage what events, services and resource are related to the DHCP Server installation. Therefore, this is a good identify to check the status of the DHCP Server and what events happened effectually it.
However, to configure the DHCP Server and see which clients have obtained IP addresses, we need to enter the DHCP Server MMC. To do so, you need to go to Outset> Authoritative Tools> DHCP Server , like this:
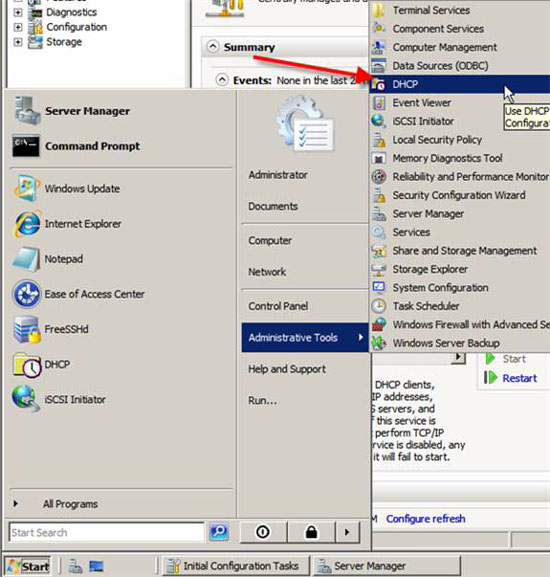
Figure ix: Starting the DHCP Server MMC
When launched, MMC will provide a lot of features. This is what when MMC appears:

Figure 10: Windows Server 2008 DHCP Server MMC
DHCP Server MMC provides IPv4 & IPv6 DHCP Server information including all scope, puddle, lease, reservation, scope options and server options.
If we get to the address pool and scope options, we can come across the configuration we created when installing the DHCP Server. The IP address range is here and and so is the DNS Server & default gateway.
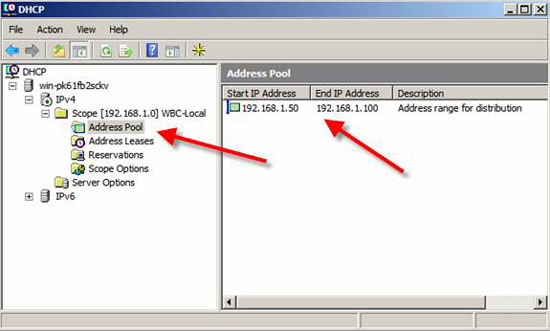
Effigy 11: Address Pool of DHCP Server

Effigy 12: Scope Options of DHCP Server
Then how practise nosotros know if the configurations work? To know that, we have to do a test.
How to exam Windows Server 2008 DHCP Server
To test information technology, we have a Windows Vista client on the aforementioned network segment every bit the Windows Server 2008 DHCP server. For safety purposes, we exercise not add other devices to this segment.
Using the IPCONFIG / RELEASE command and so IPCONFIG / RENEW , nosotros verify that nosotros have received an IP address from a new DHCP server, come across the picture below:
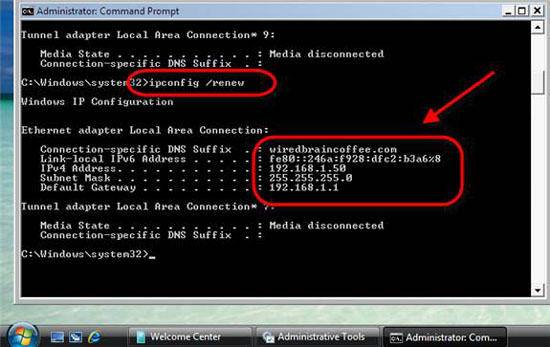
Figure 13: The Vista customer has received the IP address from the new DHCP Server
Go to Windows 2008 Server to verify that the new Vista client is listed equally a client in the DHCP server.
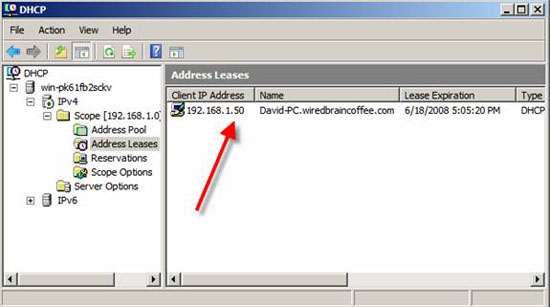
Figure fourteen: Win 2008 DHCP Server has Vista clients listed in Address Leases
With those expressions, we will know that our configuration task is complete and configure the settings to work well!
Conclude
In this commodity, I have shown you how to install and configure a DHCP Server in Windows Server 2008. During the installation process, I showed you what a DHCP Server is, how information technology is. can help you as well as how to install and manage it and the server, how to configure specific DHCP server settings like DHCP Server scopes. At the terminate, we tested the configuration postal service that was done every bit in the mail service and it worked perfectly.
Source: https://tipsmake.com/install-and-configure-windows-server-2008-dhcp-server
Posted by: florescuse1944.blogspot.com
0 Response to "How To Configure Dhcp Server In Windows 2008 Server Ppt"
Post a Comment